Preparation for painting.
I wouldn't say I'm the world's greatest painter, but I can achieve a really good finish on 15-18mm figures - the size of all my Napoleonic miniatures in a pretty quick time without having to resort to any fancy techniques or novel paint types. What I think I AM good at is mixing colours and working in a way that turns out good results without needing to be an expert. We all develop our own style and methods and this is mine for good gaming quality small scale figures.
Remember, it's important to have a good surface for painting on.
The first thing to do is get rid of any runners and flash. I use side cutters for the runners, a craft knife to pare down flash and either a file or Dremel to flatten off bases. If the figures have flags moulded on, I carefully remove these, drill a small hole in the standard bearers hand and replace the flag staff with wire. dress makers' pins are quite good for the job and don't bend. I have also "acquired" some of the head pins my wife uses in jewellery making, but don't tell her!
Once you've done this, give the figures a wash in soapy water, rinse well and dry. I've found the best way to do this is to put them in a shoe box with a hole in it to take a hair dryer nozzle. This is also useful if you paint with enamels, or alkyd paints (synthetic oils.)or are just keen to press on. It doesn't work on proper oil paints.
When painting cavalry, decide whether you want to paint them as one piece, in which case the riders will be glued onto their horses before undercoating.
Painting in one or two pieces both have their advantages and drawbacks. One piece gives better adhesion, stopping the rider falling off, whilst painting separately makes it slightly easier to paint the horse and saddlery.
I don't like to see all the horses in a cavalry regiment all exactly the same colour, so if the figures are in different poses, I like to paint the riders separately to give as much variation as possible.
If, like me you are a bit of a devil for not using proprietary paint colours and you are going to be painting a large number of figures, mix up a batch of paint to the consistency you want in a large enough quantity for them all. I keep empty paint pots and clean them out ready for this. There's nothing worse than getting part way through a regiment and finding you can't quite match up a colour again!
Undercoating
When the figures are dry, you are ready to start undercoating your figures. Over the years, I've tried all sorts of ways of undercoating -even spray painting, but I've found this to be too uneven, sometimes too thick and too expensive, Far better to use a couple of thin coats of watered down primer applied with a soft brush, allowing each coat to dry before putting on another. Tony Barton of AN fame recommends using matt white enamel and I find that works well, with the slight unevenness from the brush strokes helping to act as a key.
 |
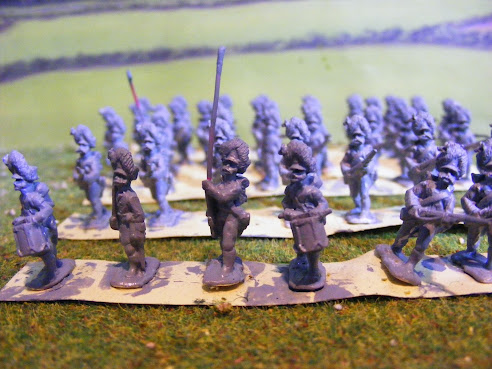
| White undercoated French Guard Grenadiers |
Many painting "experts" will tell you to mount each figure on a cork, wood block etc. which is all very well if you are painting large figures, character pieces or have more time than you know what to do with, but for the 15-20mm battalions, by far the best way is to mount the figures on strips of card wide enough to keep your fingers off the paint and flexible enough to bend.. It's amazing how much time you save just by not having to keep picking figures up and putting them back down. Paint all one side of a strip then flip it over and paint the other.


No comments:
Post a Comment